
by Michael J. “Mick” Kaufman
© Copyright 2021. All rights reserved!
Published in Midwest Flyer Magazine – December 2021/January 2022 Online Issue
Over the many years of writing this column, I have put emphasis on making instrument flight easier. I have had some recent instructional flights where I watched pilots show me just how difficult a flight can be. We should use checklist flow patterns and acronyms in the cockpit to do tasks in a logical manner. We should also know and understand the by-the-numbers concept that I also have written about previously in my column.
In this article, let’s assume this is for single-pilot IFR, as it would be different with a two-pilot crew. I always use some sort of written checklist while on the ground, and I want to emphasize that this is in an aircraft that is not moving. The latest trend in accidents and incidents is running off the taxiway or running into something while taxiing and programming our navigators. While taxiing, all concentration should be on the task at hand as we humans are not good at multi-tasking. I find it very helpful to program the cleared route into the navigator while on the ramp and before starting the engine, if possible. As we have advanced in technology over the last few years, it is now possible to receive our expected clearance on our tablets with “ForeFlight.” With Garmin “Flight Stream” and other similar devices, it is possible to transfer the data to our navigators.
On a recent trip from Wisconsin to the Los Angeles area, I am sure there were some 50-plus waypoints along my route, which were mostly on airways, especially those in mountainous terrain. As the technology advances, it will soon be possible to receive our route from ATC electronically and having it go directly to our navigators.
In this article, I will be referring to several procedures I use to make flying on instruments easier. They are called by-the-numbers and the six configurations of flight, and they work together and help reduce workload while flying on instruments and can be used in VFR flight as well.
When learning to fly on instruments, these are important concepts. However, as we lose proficiency and become complacent, we tend to forget them. As a review, we will look at these concepts in depth and, hopefully, they will reduce your workload on your next instrument flight.
Six Configurations of Flight
Takeoff and Climb
Cruise Level
Cruise Descent
Approach Level
Approach Descent
Non-Precision Approach Descent
Take-off and climb, in most normally aspirated piston aircraft, require full power and low pitch/high RPMs, full rich mixture (at sea level). Once at a safe altitude, I reduce the propeller for noise abatement; otherwise, full power with leaning above 5000 feet as necessary until reaching cruise altitude. This is so simple, yet I constantly see pilots trying to tweak engine parameters during the climb. It is not necessary and takes the pilot’s concentration away from much more important tasks. This is also where I see pilots begin to start playing with their Primary Flight Display (PFD) and lose concentration on what comes next.
On my recent trip to California in my Bonanza, and on my departure clearance heading back home to Wisconsin, I was to fly the Riverside 2 Departure (RAL2.PDZ). This is an obstacle departure and was not in my GPS database.
The departure called for departing Runway 27, fly a heading of 255 degrees to intercept the 030-degree radial of the Paradise VOR (PDZ), and track it inbound to cross the VOR at or above 5000 feet. If not, we were to climb in a hold till reaching 5000 feet before proceeding on course. This was a “fly the airplane” departure, and the only engine adjustment was the propeller adjustment for noise abatement.
The “5 Ts”
Turn
Time
Twist/Track
Throttle
Talk
I had the frequency to the Paradise VOR set in my second radio with the 030-degree radial selected before takeoff. The 5Ts came into play upon intercepting the 030-degree radial with a turn to 210 degrees, nothing to time, a twist of the Omni Bearing Selector (OBS) to 210 degrees (as I have no HSI), track the radial to the VOR… No throttle as I was still climbing, and no talking with nothing to report at the time. I was able to meet the climb gradient to cross the VOR at 5000, so no hold was necessary. I was asked to report proceeding on-course after crossing Paradise, which I did, and now well on my way to the next waypoint, I engaged the autopilot GPS steering and did my first engine adjustment, which was leaning the mixture as I was on my way to 11000 feet.
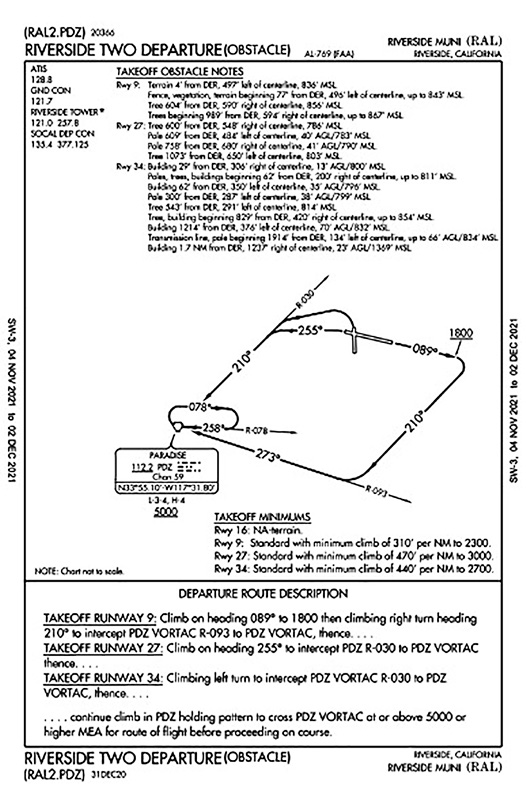
After reading about my departure out over Riverside, California (KRAL) and looking at the departure procedure (FIG 1), you may be questioning as to why I did certain things, thinking I could have done it an easier way.
For example, why not load the departure from the navigator’s data base… why use the VOR at all… why dial in the 030-degree radial instead of putting in 210… why hand-fly this departure, and instead, use the autopilot?
To answer your questions, first, as I said, obstacle departures are not in the database on my navigator, but they may be in yours. Putting a VOR frequency in a legacy radio and setting a radial is very easy. It has always been my preference to set in a radial when using a VOR. I can then choose whether to track it inbound or outbound when intercepting it. I personally like to hand-fly departures until a lower workload permits me to monitor the autopilot to make sure it is working and programmed properly. The by-the-numbers gave me the pitch attitude and airspeed I needed in the climb to reach the Paradise VOR above my target crossing altitude.
As we look at the concepts I used during my departure of by-the-numbers and the six configurations of flight, we can apply them to the entire flight, which we will do in future issues of Midwest Flyer Magazine. I made one change in the power setting during my initial climb and that was adjusting the prop for noise abatement. I made no screen changes on my Multi-Function Display (MFD); I was just hand-flying the airplane. The screen was set prior to departure and later zoomed out when on the autopilot and my workload permitted. Let’s prioritize tasks – fly by-the-numbers and use the Five (5) Ts.
Until the next issue of Midwest Flyer Magazine, fly safe and more relaxed!
EDITOR’S NOTE: Michael J. “Mick” Kaufman is a Certified Instrument Flight Instructor (CFII) and the program manager of flight operations with the “Bonanza/Baron Pilot Training” organization. He conducts pilot clinics and specialized instruction throughout the U.S. in many makes and models of aircraft, which are equipped with a variety of avionics. Mick is based in Richland Center (93C) and Eagle River, Wisconsin (KEGV). He was named “FAA’s Safety Team Representative of the Year” for Wisconsin in 2008. Readers are encouraged to email questions to captmick@me.com or call 817-988-0174.
DISCLAIMER: The information contained in this column is the expressed opinion of the author only, and readers are advised to seek the advice of their personal flight instructor and others, and refer to the Federal Aviation Regulations, FAA Aeronautical Information Manual and instructional materials before attempting any procedures discussed herein.