by Michael J. “Mick” Kaufman
Published in Midwest Flyer – April/May 2017
It always saddens me to hear about aircraft accidents, but I always try to think of items to write about, which may help pilots avoid them in the future. In this issue, I will cover instrument departures and “Flying By The Numbers.”
When a pilot gets his/her instrument rating, chances are they have had very little actual instrument flight time, if any, so now is the time to learn how to do it correctly.
When I train an instrument pilot from start to finish, I use a very structured syllabus and I only do concentrated training. The one or two-hour flight lessons once or twice a week are not conducive to training a good instrument pilot. It takes a year or more to accomplish the task, and it costs the applicant an additional 50% or more.
Some 25-plus years ago, I became an instructor for a company called Professional Instrument Courses (PIC) and learned their instruction method, as well as the importance of using a good syllabus and lesson plan. I have adopted that method and have been using it ever since.
I often get calls from pilots wishing to finish their instrument training, and I ask them how much instrument time they have and what exercises they have been doing with their instructor. The answer that is quite common is: “5 hours of instrument time and we have been doing ILS and GPS approaches.” I rarely start approaches until the applicant has 20 hours of instrument time logged. I will discuss this later in the article on the topic of “Flying By The Numbers.” But the first topic I want to cover is the lack of experience flying in actual instrument conditions, which was the cause of a recent accident.
As mentioned earlier, many newly rated instrument pilots have never flown in actual IFR or Instrument Meteorological Conditions (IMC) during their training, nor have they made an IMC departure from an airport.
We, as instructors or pilot examiners, try to instill in new instrument rated pilots to start exercising the rating by having them first file IFR and fly in the system on those perfect VFR days to gain radio experience. Once the pilot has reached a reasonable comfort level, we should fly in the clouds to get that IMC experience with rather high ceilings. Now comes that next and biggest step of a low IMC take off and departure. I recommend the pilot do this with his instrument instructor the first time for safety reasons, and to avoid becoming overwhelmed.
In the perfect world on day nine of a 10-day instrument course, it would be great to have that 200 to 500 ft. overcast and 1 mile visibility for departure for that required Federal Aviation Regulation 250 nm cross-country, but this is not that perfect of a world.
All those instrument departures should begin with a thorough weather and airport briefing prior to departure with an emphasis on studying the approach charts for the departure airport, as well as Standard Instrument Departures (SIDs) and obstacle departure procedures. Something to consider would be where would you go if you had an emergency or no equipment failure after takeoff. For training purposes in our Baron Bonanza Pilot Training program (BPT, Inc.), we require circling weather minimums for the departing airport.
A comment I have made many times before in my column is no IFR after an aircraft recently comes out of maintenance or the aircraft is new to you. If you are departing from a tower-controlled airport, expect a SID or departure procedure. Take your time analyzing that procedure to make sure you can comply before departing. Many pilots are not aware that all of those modern GPS navigators with databases have SIDs available to load. Once you have received your clearance, then load the SID before departure. All of this will reduce your workload after departing.
This is where flying in IMC can get overwhelming to the new instrument pilot after departing, as they will be trying to watch outside of the windshield, which is the wrong thing to do, and then comes the vertigo. I have lost count on how many times I had to take the controls or interject some help in this scenario. To avoid this, transition to your flight instruments the instant the aircraft has lifted off and the proper pitch has been established for the aircraft you are flying. If you have a flight director (I love flight directors) with a go-around button, line up with the runway, set the heading bug to the runway heading, and push the go-around button for the flight director. This will give you the proper pitch and direction information before and during the departure.
I recommend hand flying the flight director until reaching an altitude where the workload allows you to monitor the autopilot for proper operation after turning it on. I have seen cases where the autopilot malfunctioned or was incorrectly programmed, and if the pilot was distracted by another task, there could have been an accident.
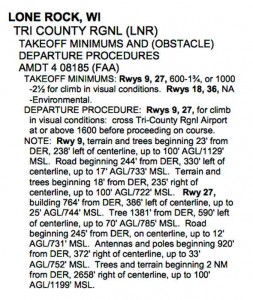
When departing from a Class G airport without a control tower, it is extremely important to check the obstacle departure procedure before departing (FIG 1). You may find that certain runways are not authorized for departure under IMC.
Be familiar with the airspace around the airport. For example, your clearance may read: “You are cleared from the 93C airport to the Oshkosh airport via direct LNR, direct. Climb and maintain 3,000, expect 5,000 10 minutes after departure. Enter controlled airspace on a heading of 180. Upon reaching 3000, direct LNR. Contact Chicago Center on 133.3. Squawk 0455. Clearance void if not off by 15 past the hour. Advise no later than 25 past the hour.”
After attempting to decipher your short hand, you need to remember a few important things. Once you read back the clearance and depart, you are required to follow that clearance. If you had a communications failure, and yes they still do occur, you are expected to comply with that clearance. I make it a habit to acknowledge a new clearance or routing from ATC with the phrase “stand by for read back.” This lets the controller know you have received the clearance and are checking to see if you can accept and comply with it, not leaving the controller wondering if his/her transmission was received. Once I am satisfied that it will work and I can comply with it, I read it back.
In the sample clearance above, I want to clarify the part of the clearance, which says, “Enter controlled airspace on a heading of 180.” This was part of the clearance for two reasons: 1) to make it clear as to the heading the controller wants you to fly for traffic/terrain, and 2) to make you aware that the departure airport is within Class G airspace.
Departing a Class G airport means you have no traffic separation from VFR traffic. Most of the Class G airports have controlled airspace beginning at 700 feet AGL, so there could be VFR traffic in the pattern legally with 1 statute mile and clear of clouds, providing they are below 700 AGL. There is a lot to think about on those first low departures into IMC conditions, especially at non-tower airports.
Flying By The Numbers
In several of my previous columns, I have mentioned “Flying By The Numbers.” This concept of training began with pilot training during World War II, but did not surface in GA until John Eckelbar published several books on the concept. When I learned to fly instruments, I did not learn that concept, but adapted to it many years later after reading John’s book. A pilot using the “Flying By The Numbers” concept will find it much easier to transition to a different aircraft if the numbers for that aircraft are known, and the instructor doing the check out is a “by the numbers” guy!
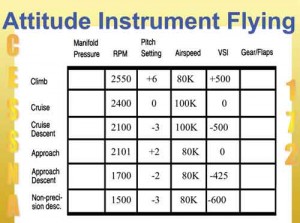
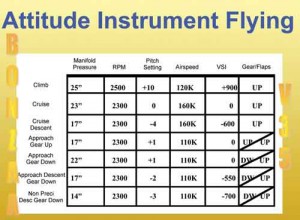
The basic concept of “Flying By The Numbers” is that history tends to repeat itself, so there is some memorization that needs to be done on the part of the pilot, and that is for each different aircraft. I make a graph and fill in the numbers as I work to make the graph as simple as I can. (FIG 2 – see following page) Cessna 172. (FIG 3 – see following page) V-35 Bonanza. It is worth the time if you are pioneering a new graph for an aircraft to try to achieve numbers that tend to remain the same and are easy to remember.
So many pilots feel they need to fly a precision approach as slow as they can. For example, you could fly a Bonanza at 85 or 90 kts on the approach and that puts it in the A category for speed, but it flies much better at 110 kts and makes the by the numbers graph simpler to remember.
A number of years ago, I was working with an instrument pilot in a Cessna Turbo Centurion, and we were trying to establish speed and power settings for a precision approach. We had our minds set on flying this approach at 100 kts and tried all kinds of power and flap settings, but it just was not working. We kept coming back to a power and configuration that worked, but it was at 120 kts. I told him that the examiner would bust him on his checkride, if he flew the approach that fast on the flight test.
This instrument pilot used his aircraft for business and had hired a commercial pilot to fly for him. That pilot had attended Flight Safety on this aircraft. Flight Safety uses the by the numbers method of training, so I asked to see what numbers they used in their training manual and it was the same that we had used successfully with the 120 kt precision approach. I had my instrument student take the Flight Safety Manual with him for his flight test in case there was a question on the approach speed, as you can’t argue with Flight Safety’s reputation on flight training.
When I last updated the equipment on my Bonanza, I made one mistake that saved me some money, but could have made the by-the-numbers flying much easier, and if you are making an equipment update list, don’t make the same mistake I did.
If you notice on the graph (FIG 3) on the Bonanza, there is a line for engine RPM and one for manifold pressure. A combination of manifold pressure and RPM can be condensed into one usable number, which is the percent of power, if you have an engine monitor that can compute percent of power. If I would have spent the extra money on the option of displaying percent of power, this would have simplified power settings, and would have put me in a concept similar to those in turbo props and jet aircraft that show power on a percentage basis. Most engine monitors that show percent of power for piston engines also take temperature and barometric pressure into the equation, making for better precision in flying by the numbers.
The “Flying By The Numbers” equation can be shown several ways:
Pitch + Power = Performance
Attitude + Power + Configuration = Performance.
In the two equations, “Pitch” and “Attitude” have the same meaning and the words can be interchanged. Power in either can refer to RPM (fixed pitch prop) or RPM and MP (Manifold Pressure) on an altitude engine. Should you have percent of power available, use it on your engine monitor, piston or jet. Configuration is referring to landing gear and flap settings. Performance is the airspeed and a rate of climb/descent or cruise you are seeking in the equation.
Use the “Flying By The Numbers” concept, construct your graph and experiment with it before it becomes the final draft for a particular airplane. Keep your graph when you fly that airplane and if this is the only airplane you fly – or you fly it on a regular basis – memorize the numbers. You will find it will be much easier and safer to fly the airplane using this concept.
EDITOR’S
NOTE: Michael J. “Mick” Kaufman is a Certified Instrument Flight Instructor (CFII) and the program manager of flight operations with the “Bonanza/Baron Pilot Training” organization. Kaufman conducts pilot clinics and specialized instruction throughout the U.S. in a variety of aircraft, which are equipped with a variety of avionics, although he is based in Lone Rock (KLNR) and Eagle River (KEGV), Wisconsin. Kaufman was named “FAA’s Safety Team Representative of the Year” for Wisconsin in 2008. Email questions to captmick@me.com or call 817-988-0174.
DISCLAIMER:
The information contained in this column is the expressed opinion of the author only, and readers are advised to seek the advice of their personal flight instructor and others, and refer to the Federal Aviation Regulations, FAA Aeronautical Information Manual and other instructional materials before attempting any procedures discussed herein.

