by Michael J. “Mick” Kaufman
Published in Midwest Flyer – August/September 2017 issue
In the June/July 2017 issue of Midwest Flyer Magazine, I addressed the topic of “circle-to-land” approaches and some of my comments were for pilots to avoid them whenever possible. I just finished reading a preliminary accident report of a fatal accident of a Lear 35 at Teterboro Airport, Teterboro, New Jersey (KTEB), which occurred on May 15, 2017. This aircraft was on a circle-to-land approach, and I have included a few excerpts below from the National Transportation Safety Board (NTSB) report, but I urge our readers to read the entire NTSB Report #CEN17FA183, available on the Internet. In talking with several professional pilots, especially airline pilots, their companies have specific rules prohibiting these approaches.
On May 15, 2017, at 1529 eastern daylight time, a Gates Learjet 35A, N452DA, operated by Trans-Pacific Jets, departed controlled flight while on a circling approach to runway 1 at theTeterboro Airport (TEB), Teterboro, New Jersey, and impacted a commercial building and parking lot.
The New York Terminal Radar Approach Control (TRACON) cleared the flight for the TEB ILS Runway 6 Approach, circle to land runway 1.
I think many of us upon reading the report would call this a pilot error, but we can go on and on reading reports of accidents involved in circle-to-land maneuvers. It puts the pilot in a tight situation with terrain/obstacles, slow airspeed, tight turns and keeping the airport runway in sight. I will discuss this topic more in future issues and will be looking for comments from our readers.
I found the topic of holding patterns a good topic for this issue of Midwest Flyer Magazine, as it is still an important part of instrument flying and an often-misunderstood topic.
I remember the first holding clearance I received while flying IFR in Instrument Meteorological Conditions (IMC), and it was 45-plus years ago, but very memorable.
I was on my way back from Rochester, Minnesota and I had just dropped off a friend to visit a patient at the Mayo Clinic and was returning home. I had received my instrument rating a few months previously, and this was my third flight in IMC conditions. Back in those days, there were few autopilots and it was VOR and ADF navigation.
Shortly after takeoff from Rochester, and in IMC conditions, I received a holding clearance at an intersection. I was truly grasping for straws as I had no idea how to enter the hold, but I did remember not to hold at cruise airspeed, so immediately reduced airspeed. There was not much of a difference between cruise and holding airspeed in my old Cherokee 140, but it was enough. Before I reached the holding intersection, I was cleared to my destination. Back on the ground at my home airdrome, I evaluated my lack of knowledge and decided to draw holding patterns whenever I was given a holding clearance, and this has always worked for me. If I can visualize the hold, I can fly it, along with the entry.
Some years later, I received a phone call from an airline captain, who had been flying a Boeing 747, and he wanted some dual on holding patterns as he was going to take a Part 135 checkride in a Cessna 310. He told me that the 747 did the holding patterns for him; all he had to do was program them into his magic box. On the flight, which followed a few days later, I assigned him a hold. He was right that he had forgotten how to do them and did one backwards.
Today, many of us have those magic boxes in our aircraft and our skills to visualize and fly a hold have diminished. I have not received a holding clearance in the Midwest in several years, but we must keep our holding pattern skills sharp for the unexpected. If you fly much in the northeastern U.S., you are sure to get holds more often than in other parts of the country.
For the benefit of our readers, I will explain the different holding techniques, starting from the basics to using the most sophisticated of magic boxes. We will review wind corrections beginning with the educated guess, to using air-data computers and autopilots with the GPSS steering option.
Categories of Holds & Places Holds Are Assigned

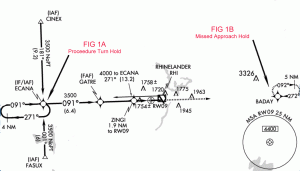
Holding patterns fall into two categories, “published” (charted) and “non-published.” The published ones are those associated with a missed approach or are actually the procedure turn shown and drawn on an approach chart (FIG 1). If they are at different locations, the hold drawn with a solid line is the procedure turn hold (FIG 1a) and the one with the broken line (FIG 1b) is the missed approach hold. If only one hold is shown, it means that both are located at the same fix and represented by a solid line.

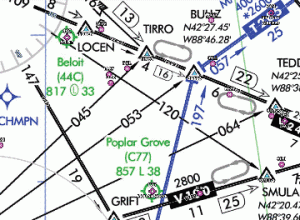
Sometimes, we see holding patterns drawn on an enroute chart, which is also a published (charted) holding fix (FIG 2). If the holding pattern is of the non-published variety, it is given to you as a verbal description by the controller. These are the ones that most pilots have trouble with as most of the early GPS devices do not have the capability of drawing and flying these holds without a lot of manual help from the pilot. Several of the most popular boxes that will not fly these non-published holds or the ones drawn on enroute charts are the Garmin 430/530 GPS navcoms and the Garmin 650/750 or G1000 with some of the early firmware. The Garmin 650/750 and G1000 navcoms with upgraded firmware will. We will cover setting up non-published holds with these GPS devices in a future article.
The one device that does a great job setting up non-published holds was the UPS technologies CNX80, which later was manufactured by Garmin and relabeled the Garmin 480. This device was way ahead of its time for general aviation, as it had the air-data function, as well as holding pattern design architecture.
Holding patterns can be drawn almost anywhere or assigned to the pilot at any identifiable fix by ATC, with the following examples of a few:
Final Approach Fix (FAF)
Initial Approach Fix (IAF)
Intermediate Approach Fix (IF)
VOR
Airway Intersection
GPS Waypoint
DME Fix from a VOR
NDB
Size & Shape of A Hold
The standard hold is a racetrack pattern, which is standard with right turns and one-minute legs (no wind), with wind correction. The pattern is adjusted to make the inbound leg the one-minute leg. This requires some pilot experience and an educated guess to get the holding pattern adjusted to conform to these specs if you don’t have a magic box with the air-data option. It should be noted that it takes three turns around the holding pattern for the average pilot to get it within specs. On many of the GPS approaches, the holding patterns have a leg length given in nautical miles, rather than in time. On some non-published holds, ATC will assign a DME leg length. Holding patterns are much easier today with GPS than they were 20 years ago, as I remember holding at an intersection with only one VOR.
Drawing The Hold & Entry

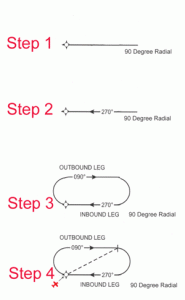
If the hold is a non-published one, it should be drawn on paper (FIG 3) using the following technique as described by air traffic control (ATC) per this example: ATC: “Piper 4257 November, we have holding instructions. Advise when ready to copy.”
Pilot: “Ready to Copy.”
ATC: “57 November is cleared to the Rhinelander VOR to hold East on the 090-degree radial. Right turns. Expect further clearance at 20 past the hour.”
In drawing this hold, I start with a dot on the paper to represent the fix and then draw the radial in perspective (remember radials are “from” the fix and bearings “to” are to the fix and are opposite (FIG 3 Step 1). The next and important step (FIG 3 Step 2) is to draw an arrow to show the flight path and label the direction to the fix. This is where many pilots get the wrong perspective of the holding pattern because they forget this step. I then complete the drawing of the racetrack pattern (FIG 3 Step 3) showing a left or right-hand direction of the pattern. In this case, it is to the right. I mark my position on the paper relative to the fix to see what type of entry to the pattern I will make. An arrow showing the wind direction is also useful to help me visualize my crab angle and timing of the pattern legs. It should be noted in the clearance above that the ATC controller specified right-hand turns, as this is a standard for a hold and could be omitted in the clearance. Should the hold be a non-standard, left-hand hold, the direction would always be included in the clearance. The controller also did not mention leg length, meaning that it was the standard one-minute leg. Pilots should check the Aeronautical Information Manual (AIM 5-3-8) for holding airspeed and leg length for the altitude being flown. The entry into this hold (as shown) is a teardrop entry derived from the position of the aircraft from the fix.

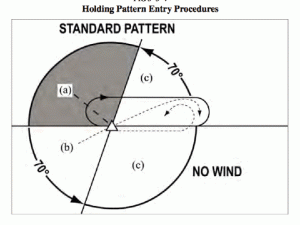
In FIG 4, I depict the recommended entry as shown in the AIM. The method that I have used is to calculate the entry using the fewest degrees of initial turn once I cross the fix the first time. Of course, if you have one of those magic boxes, it does it for you.
I had the opportunity to fly with a student from Milwaukee, Wisconsin in his beautiful A-36 Bonanza a few days ago, and we decided to try a holding pattern in a 50-plus knot wind. This would be a tough hold for the best of pilots, but the student had an air-data computer interfaced to his Garmin 530. I do not see this option installed very often on the Garmin 530, and we were excited to give it a whirl. I was amazed to see the holding pattern drawn with wind corrections on the 530 screen and the autopilot flew it perfectly with no over or under shoot, and the timing on the inbound leg was within 3 seconds.
When you read this issue of Midwest Flyer Magazine, we will be approaching the time of the world’s greatest aviation show, “EAA AirVenture Oshkosh.” I am hoping to have updates on some of the nifty new boxes and gizmos that will help improve both the way we fly and aviation safety.
I want to caution everyone flying to the event not to do anything stupid, and remember who is pilot in command. You know your limitations and the limitations of your aircraft, but the controllers or volunteers on the ground do not. Don’t hesitate to refuse a clearance if it puts you and your aircraft in an unsafe situation, and most of all have fun. Till next issue, fly safe and fly often!
EDITOR’S NOTE: Michael J. “Mick” Kaufman is a Certified Instrument Flight Instructor (CFII) and the program manager of flight operations with the “Bonanza/Baron Pilot Training” organization. Kaufman conducts pilot clinics and specialized instruction throughout the U.S. in a variety of aircraft, which are equipped with a variety of avionics, although he is based in Lone Rock (KLNR) and Eagle River (KEGV), Wisconsin. Kaufman was named “FAA’s Safety Team Representative of the Year” for Wisconsin in 2008. Email questions to captmick@me.com or call 817-988-0174.
DISCLAIMER:
The information contained in this column is the expressed opinion of the author only, and readers are advised to seek the advice of their personal flight instructor and others, and refer to the Federal Aviation Regulations, FAA Aeronautical Information Manual and other instructional materials before attempting any procedures discussed herein.