by Michael J. “Mick” Kaufman
Published in Midwest Flyer – October/November 2017 issue
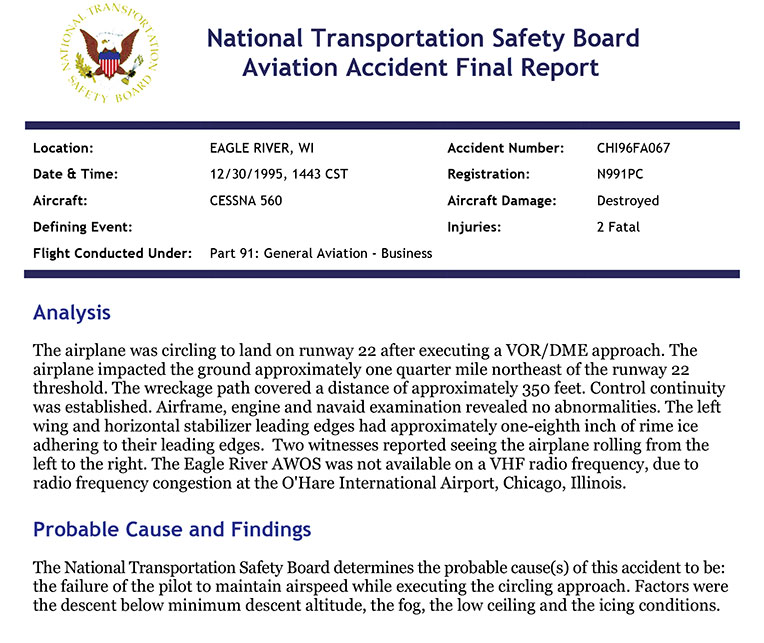
“The procedure turn” is a topic I have written about in the past, but due to some recent changes in approach procedures, it is a topic worth revisiting at this time. Another topic worth revisiting due to the high number of accidents that have occurred executing these maneuvers are “circle-to-land approaches” (FIG 1).
The Procedure Turn… When & How?
The procedure turn is referenced in Federal Aviation Regulation (FAR) 91.175 and in Aeronautical Information Manual (AIM) Chapter 5-4-9 for those readers who would like additional information on the topic. Procedure turns are often confusing to pilots, so I am hoping this article will provide clarification.
In flight training, I find that most pilots can fly the approach either with the autopilot or by hand flying, although I continue to find that the latter method seems to have become a weaker skill. So, how do we transition from the en-route phase of flight to the approach, and is a procedure turn (course reversal) necessary? If I were to generalize getting established on an approach from the en-route segment of flight, I would say to fly directly to the Initial Approach Fix (IAF) and begin the approach, but there are so many caveats that need to be addressed, which we will look at and discuss in detail with examples. First, I will list the following conditions, then discuss them as conditions eliminating a procedure turn in more detail:
1. When receiving radar vectors to the final approach course.
2. When the symbol “No PT” is depicted on the initial approach segment being used.
3. When conducting a timed approach from a holding fix.
4. When cleared for a straight in approach by Air Traffic Control.
5. When a holding pattern procedure turn is shown and none of the above applies.
6. When a teardrop procedure turn is shown (Procedural Track).
7. There is no procedure turn shown on the chart.
When covering each of the above items in greater detail, it is important for the pilot to understand number “1.” When getting radar vectors for an approach, a course reversal should never be done. If the pilot is in doubt, he needs to ask the controller. The controller’s handbook (when followed) states that whenever a controller gives radar vectors, it should be specified with the reason for the vector when giving the first vector to the pilot. For example: “Cessna N22HB, turn right heading 270, vectors for traffic,” or “Piper N6346R, turn left heading 210, vectors for the descent.” It may be confusing to know that in either of the above cases, the procedure turn is not eliminated, as neither one of these vectors were for the approach, which should be clearly specified by the controller. If you as the pilot are unsure, ask the controller.
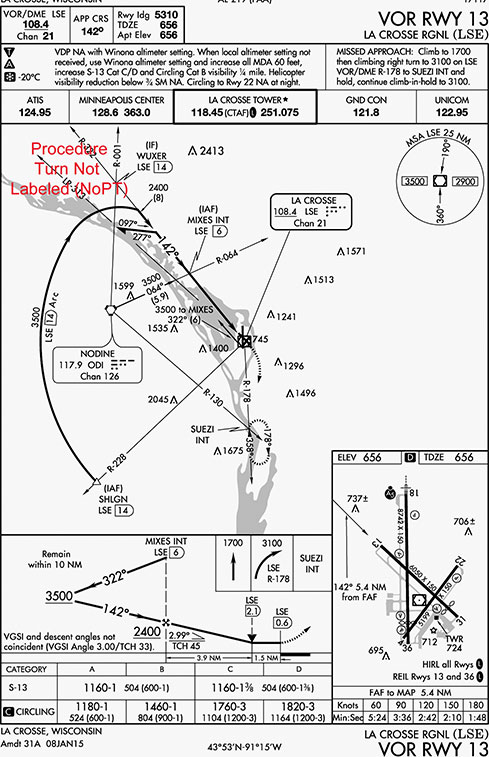
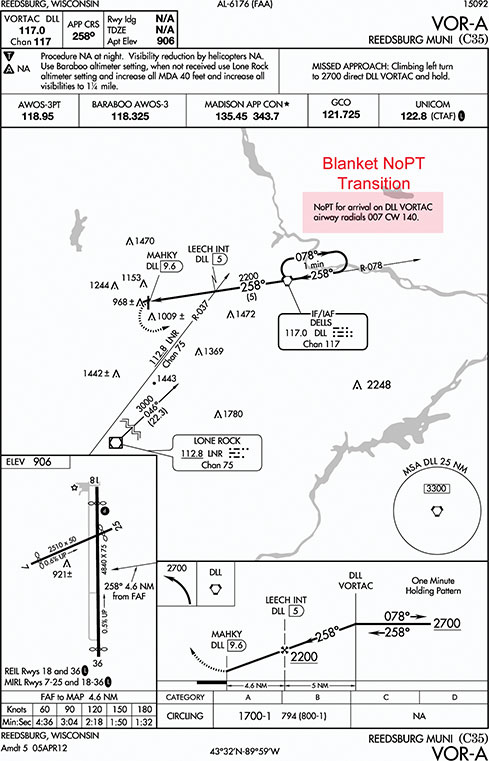
Item 2 of the list requires a lot of explanation and examples. The first example is when flying a DME arc, which I used to explain as a separate item, but have chosen to include it in the “No PT” section. The standard procedure when an arc is assigned or requested by the pilot is to join the arc at the IAF, which is on the far end of the arc. This has been a controversial topic for years among pilots and instructors, so I will give you my opinion on this item. In some cases, flying to the IAF then flying the complete arc would cause the pilot to add several minutes to the approach, where joining the arc mid point would shorten the approach. To make this legal in my opinion, you should ask the controller for a vector or heading to join the arc, eliminating any question. In some cases, the controller will assign this in your approach clearance. Example: “Piper 78459, fly heading 210 to join the 10 DME arc, report established on the arc.” It should be pointed out that when flying an arc, a procedure turn should never be done even if the arc is not labeled “No PT.” It is rare to find one that is not labeled “No PT,” but I found one in (FIG 2). Another example is a “No PT Transition” where a pilot flying from a fix to the IAF along a published course with an altitude specified and is labeled “No PT.” It is important to note that the pilot is required to maintain the last assigned altitude while flying this transition unless “cleared for the approach” by ATC. Sometimes, there is a notation on the approach chart specifying that pilots arriving from a specific direction are not required to do a procedure turn course reversal (FIG 2b); I refer to this as a “blanket transition.”

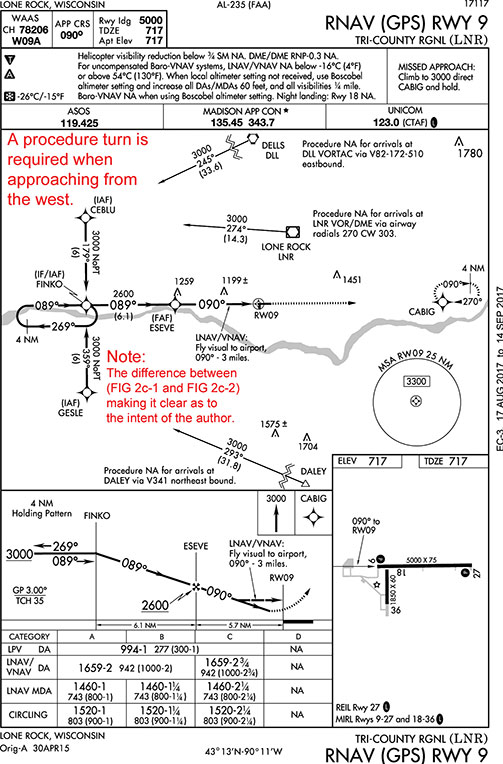
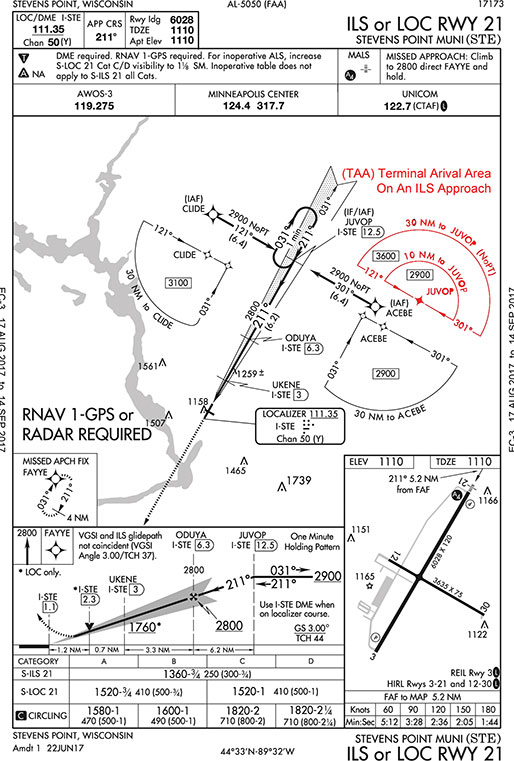
When GPS approaches came into existence, a new definition became part of the pilot vocabulary, which is the “TAA” (Terminal Arrival Area). This brought another method of eliminating the procedure turn as some of these segments were labeled with the “No PT” (FIG 2c-1) showing a situation similar to the “blanket transition described and shown above. I remember from a previous article I had written in Midwest Flyer Magazine, where I displayed and referenced (FIG 2c-2) stating that a procedure turn was required when approaching from the west and using “FINKO” as the IAF on this approach. I received some contrary feedback from our readers. Note the difference between FIG 2c-1 and FIG 2c-2, making it clear as to the intent of the terpsters writing the approach. In looking at a recent approach change (FIG 2d), I was surprised to see a TAA depicted on a non-GPS approach, which is the first one I recall seeing. I believe this rewrite of the approach is due to the future shut down of the Stevens Point (STE) VOR.
Item 3 deals with being cleared for a timed approach from a hold. It has been many years since I have had a timed approach from a holding fix, and many of you may have never heard of it. This is where ATC would build a stack above a fix and aircraft were holding at different altitudes and given an EFC (Expect Further Clearance) time to leave the hold. As aircraft at the bottom of the stack would leave the hold and proceed inbound on the approach, the next airplane would drop down and adjust its holding pattern to arrive over the fix to begin the approach as close as possible to the EFC time.
Number 4 is an easy one similar to number 1, where ATC clears you for the straight-in approach. There is one small error that a pilot could make, and that is the difference between a straight-in approach and a straight-in landing. The confusion is that a straight-in approach means no procedure turn, and a straight-in landing means you do not circle for a different runway.
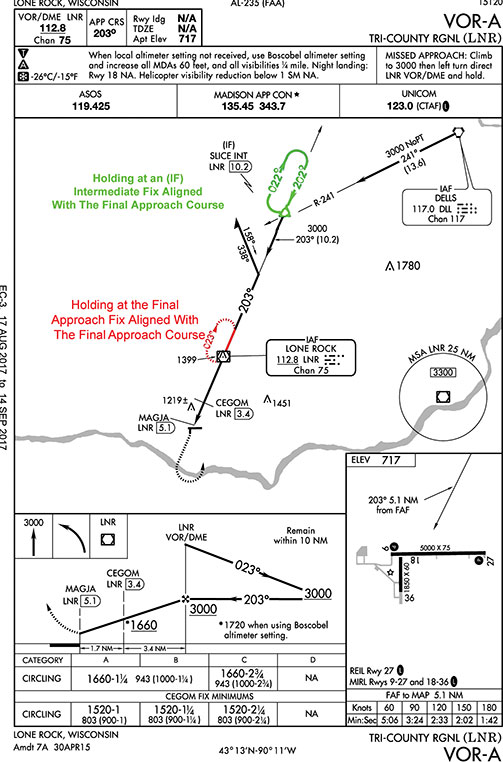
Number 5 addresses the holding pattern style of a procedure turn, which should be flown as drawn on the chart. It has always been confusing to pilots as what to do as to the entry, and how many times does one go around the “race-track” pattern to satisfy the intent of the terpster. Entries should be the same as if this were a standard hold as part of the missed approach or assigned by ATC. The difference between the missed approach hold and the procedure turn version is how it is drawn on the chart (FIG 3 Red or Green). The procedure turn version is always drawn with a heavy solid line (Green), and the missed approach version is a broken line (Red). If both are co-located, it is depicted as a solid line, meaning the procedure turn and missed approach are at the same fix. When entering as a procedure turn, the pilot should use the same techniques (parallel, teardrop, or direct) as if it were a missed approach hold. The next and confusing part is how many turns around the hold should the pilot do before proceeding in on the approach once cleared by ATC. The secret is not to count the turns, but rather count the times you cross the holding fix and that number should be two regardless of the entry.
Should ATC assign a hold at the fix due to traffic, we have a different situation. To better explain what is to be done in this situation (FIG 3), try to follow this statement: “When holding at the FAF or IF that is aligned with the final approach course, though shall not do a procedure turn when cleared for the approach.”
In following this diagram (FIG 3) on the approach, should you be holding as depicted, you would not do the procedural turn. The important criteria is that the holding pattern is aligned with the inbound approach course. Should the hold not be aligned with the inbound course, we would still need to do a procedural turn. In theory if we look at the approach chart, we see that both the LNR and DLL VORs are labeled IAF, and there is an IF (intermediate fix) at the slice intersection. If I were coming from the DLL VOR, there is a “No PT,” showing that if I were flying from that direction, I would not do a procedure turn. If I was proceeding along the route between DLL and Slice and ATC gave us the following clearance: “Bonanza 25DM, you are cleared to the Slice intersection to hold northwest on the 022-degree radial of the LNR VOR. Expect further clearance at 22:15 Z.” I have drawn (Non-Published Hold) the holding pattern on (FIG 3 in green) to show what it would look like. When the approach clearance is given by ATC, you can see that Slice is an IF, and the course is aligned, so you would proceed inbound with no procedure turn when an approach clearance is received.
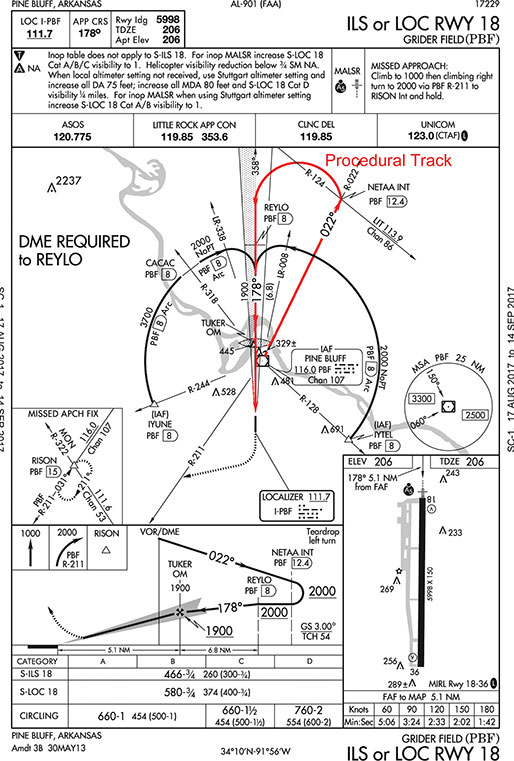
Number 6 may be the standard of course reversals. Many flight schools and instructors have different methods of making the standard procedure turn, and the FAA leaves the method selected to the pilot with one exception – the side of the course that is protected for the maneuver. We see the barb on the end of the maneuver and it is standard to turn opposite the barb, but regulations do not specify that. On the Garmin GPS boxes on the map page, a dashed magenta arc appears that shows the limitations of the airspace protected for the approach. Once your GPS has determined that you are inbound, this arc disappears. Should you look at an approach chart, you will see a notation “remain within 10 miles,” and there is a reference as to what that point is and the mileage is shown. Should the occasion happen that turning opposite the barb will put you outside the protected airspace, it is acceptable to turn in the direction of the barb. Should a procedural track (FIG 6) be shown on the approach chart, it must be flown as depicted if the pilot should choose this option for a course reversal.
Number 7 on our list applies to large airports, usually Class B airspace, where there is no procedure turn or course reversal shown on the chart. In this case, radar is always required and aircraft are always vectored for the approach.
So, the next time you are making an approach, think about what is required by procedure, and if there is a question, ask ATC; it will make the airspace system safer knowing that pilots and controllers are on the same page.
Circle-To-Land Approaches… Safe or Unsafe?
When I started my campaign against circle-to-land approaches, there was an accident I remembered distinctly, but it required some research to find it, which I finally did. It happened at one of the airports, which I fly out of on a regular basis, Eagle River, Wisconsin (KEGV) (FIG 1). As part of an instrument proficiency check that I give as an instructor, I require the pilot to exercise a circling approach by FARs. This is a useless maneuver unless it is done in instrument metrological conditions (IMC), and if it is, I consider it too dangerous to practice. Given the fact that the recent circling accident I referenced in the previous issue of Midwest Flyer Magazine, and the one referenced in (FIG 1), were both flown with professional two-pilot crews, it is no wonder the airlines either prohibit or severely restrict pilots from doing them in their flight manuals. I can understand a decade ago, pre-GPS days, where the wind did not always align with the runway served by a precision approach, and a downwind landing was not an option. Today, we have an approach to almost every usable runway. It may require a pilot to fly an extra 10 minutes to get established on the preferred approach, but it is worth it safety wise.
Happy Landings!!!!
EDITOR’S NOTE: Michael J. “Mick” Kaufman is a Certified Instrument Flight Instructor (CFII) and the program manager of flight operations with the “Bonanza/Baron Pilot Training” organization. Kaufman conducts pilot clinics and specialized instruction throughout the U.S. in a variety of aircraft, which are equipped with a variety of avionics, although he is based in Lone Rock (KLNR) and Eagle River (KEGV), Wisconsin. Kaufman was named “FAA’s Safety Team Representative of the Year” for Wisconsin in 2008. Email questions to captmick@me.com or call 817-988-0174.
DISCLAIMER:
The information contained in this column is the expressed opinion of the author only, and readers are advised to seek the advice of their personal flight instructor and others, and refer to the Federal Aviation Regulations, FAA Aeronautical Information Manual and other instructional materials before attempting any procedures discussed herein.

