by Harold Green, CFII
Situational awareness includes many considerations. The issues discussed here are a few of those that seem to be common among both students and certificated pilots.
Navigational orientation is our perception of where we are relative to objects of interest relative to our welfare. This includes the ability to correctly interpret Sectional/WAC Charts as well as our interpretation of basic and electronic navigation aids. While it may seem simplistic, we will start with Sectional/WAC charts. We will make no distinction between Sectionals or WAC charts.
Start with a question fundamental to navigation: “Where am I?” Actually that question should be asked only after we have answered another question: “Where are my reference points?” (Hopefully we have more than one.) After all, we do know where we are: We are sitting in an airplane moving at a respectable speed given by the airspeed indicator at an altitude given by the altimeter, in a direction given by the heading indicator, corrected for wind. The only question remaining is: Where are the reference points? This distinction can be very important whether we are flying VFR or IFR even though the types of reference points change. Let’s look at a sectional chart example, first.
On a reasonably long cross-country, we have a course line laid out on our chart with checkpoints identified every 20-30 miles. We have been flying along holding our heading more or less and now it comes time to check our progress. The checkpoint we are looking for has several readily identifiable features. Let’s say it’s a town located in a valley that has two hard surfaced highways passing through it roughly north-south and east-west with a small stream on the western edge of town. As we examine the terrain we naturally ask the question: “Am I at my checkpoint?” We look at the town below and see that it is in a valley with two roads and a stream. Further, the projected time is within a couple minutes from now.
As we look at the town we see a north-south road running through it with a stream on the west. The east-west road comes into town from the east, but we don’t see it leaving the town to the west. However, that is possibly due to the fact that the road would wind up in a valley between two relatively high hills and we cannot see it from our angle.
Since the time and majority of features match, we conclude that we are at our checkpoint because that is what we want. In fact, that could all be correct. On the other hand, suppose the following: As is true throughout much of the country, towns are along rivers and streams for historical reasons. Most towns have more than one road passing through. Therefore, we can easily mistake one town for another – particularly when we set out to prove that the town is our checkpoint.
Rather than ask if the town is our checkpoint, we should ask, “What town is that and how do I know?” With this in mind when we look at the town below, we find that the roads match a town on our map, but which one? Well, it could be one with only one pass-through road and one dead-ending in the town.
After critical examination we find a town that matches that configuration. Therefore, it is not our checkpoint. If we are off just a little, it will be about 7 miles from our checkpoint along the same stream. (In the Midwest, towns tended to spring up about 7 miles apart because that is about how far a team of horses could go between water and rest stops).
Now given that we made an erroneous identification, we generally will not find this out until one or more additional checkpoints have gone by. By that time we are well off course.
Conclusion: Look at the map and determine what you see on the ground. Then decide if you are where you should be. DO NOT look at the map and prove you are where you wanted to be; you can fool yourself all too easily. After all, you knew where you were all the time. You just didn’t know for sure where the checkpoint was.

Now let’s look at the “directional gyro.”
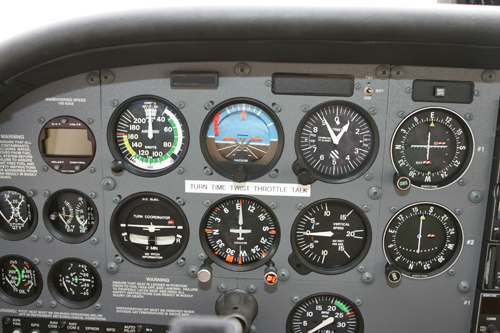
The compass rose is a marvelous device. In its basic form the compass rose is simply a circle with the magnetic bearings relative to north printed around the periphery. Then add a directional gyro to it and voila! We have a stabilized compass with our airplane located at the center of our universe depicted as pointing to our heading. The beauty of this little gem is that if you imagine yourself standing at the center, you can look in any direction and find the way to go to a specific bearing. In short, you are the center of that universe. Not only that, but you can tell which way to turn to go north, south, east or west.
For reasons, which will become obvious as our flying becomes more advanced, we should not think of turning left or right, but rather think of turning to a specific direction. If you were asked to turn to a heading of 080, you will be better served to think of turning east. Train yourself to think of compass directions, rather than left or right. This is a simple concept, but difficult to implement because we have usually used left and right for directions before we started flying. But we will leave “left or right” to the controllers who want us to turn to a specific direction to route us around other aircraft or obstacles. If we are flying a heading of 120 degrees and want to turn to 280, we know we need to turn west.
Now notice the yellow heading bug. That, in combination with the compass rose, offers us many additional advantages, both in the air and on the ground. First consider on the ground: If we set the heading pointer to the direction of the wind, the pointer position relative to our wings tells us what control position to hold to minimize the wind effect. If the pointer is aft of the 90-degree off our nose point, we roll away from it. If ahead, we roll into it. No more question about where the wind is coming from, given our present heading. (Note: We all learn as we gain experience. This little gem was passed on to me by one of my students who learned it from a previous instructor).
Now assume we are approaching our destination airport and we learn that the favored runway is 31. Now how do we find the runway and how do we enter the pattern?
We know where we are, but where is the runway? Since 31 is the no wind magnetic heading you would have on final, the compass rose will tell you where Runway 31 is relative to you, given our course from the west to the east.
Looking at the compass rose, we can see that we are heading 80 degrees to the runway. The tower then clears us to enter a left downwind for 31. Eventually we see the runway and can identify it because it lies parallel to the line 31-13 on our compass rose. When we are the appropriate distance from the runway, we then turn south and put 310 on our tail, or the six o’clock position. Remaining at the center of our universe we then wait to turn base. Since we are in a left pattern, we turn left until 310 is at the left 90-degree point on our compass rose. When we turn final we turn until 310 is pointing at our nose and then we are on final approach. In short, the compass rose tells us where to point our universe to find the point we are looking for. There are many instances where the compass rose is a good friend if just given the chance.